0%

面试题目

根据成绩表的数据统计以后更新学生表的total_score字段(即根据学生选修课程的成绩更新的总分)

表结构和数据语句

1
2
3
4
5
6
7
8
9
10
11
12
13
14
15
16
17
18
19
20
21
22
23
24
25
26
27
28
29
30
31
32
create table student
(
id bigint auto_increment,
stu_name varchar(32) null comment '学生姓名',
total_score decimal(5,2) default 0 null comment '总分',
constraint student_pk
primary key (id)
)
comment '学生表';

create table course_score
(
stu_id bigint null comment '学生id',
course_id bigint null comment '课程id',
score decimal(5,2) default 0.00 null comment '课程分数'
)
comment '选修课程成绩表';


# 新增学生数据
insert into student(id, stu_name, total_score) value (1, '刘德华', 0);
insert into student(id, stu_name, total_score) value (2, '张学友', 0);
insert into student(id, stu_name, total_score) value (3, '郭富城', 0);

# 新增课程分数数据
insert into course_score(stu_id, course_id, score) VALUE (1, 1, 80);
insert into course_score(stu_id, course_id, score) VALUE (1, 2, 80);
insert into course_score(stu_id, course_id, score) VALUE (1, 3, 80);
insert into course_score(stu_id, course_id, score) VALUE (2, 2, 95);
insert into course_score(stu_id, course_id, score) VALUE (2, 3, 85);
insert into course_score(stu_id, course_id, score) VALUE (3, 1, 100);
insert into course_score(stu_id, course_id, score) VALUE (3, 2, 75);

更新sql

  1. mysql

    1
    2
    3
    4
    5
    6
    7
    8
    update
    student s join (
    select stu_id, sum(score) sums
    from course_score
    group by stu_id
    ) c on s.id = c.stu_id
    set s.total_score = c.sums
    where 1=1; # 因为客户端限制一定要where所以加一个true
  2. oracle(使用update…set…from)

    1
    2
    3
    4
    5
    6
    update s
    set s.total_score = (select sum(score) sums
    from course_score
    where stu_id = s.id
    group by stu_id)
    from student s

修改后student表数据:

id stu_name total_score
1 刘德华 240.00
2 张学友 180.00
3 郭富城 175.00

面试题目

写两个线程,一个线程打印1~25,另一个线程打印字母A~Z,打印顺序为12A34B56C...5152Z,要求使用线程间的通信

来源: https://mp.weixin.qq.com/s/hKWL5EzyeLcdZ8qcjZ3wzg

这是一道非常好的面试题,非常能彰显被面者关于多线程的功力,一下子就勾起了我的兴趣。这里抛砖引玉,给出7种想到的解法。

通用代码:

1
2
3
4
5
6
7
8
9
10
11
12
13
14
15
16
17
18
19
20
21
22
23
24
25
26
27
28
29
30
31
32
33
34
35
36
public enum Helper {
instance;
private static final ExecutorService tPool = Executors.newFixedThreadPool(2);
public static String[] buildNoArr(int max) {
String[] noArr = new String[max];
for (int i = 0; i < max; i++) {
noArr[i] = Integer.toString(i + 1);
}
return noArr;
}

public static String[] buildCharArr(int max) {
String[] charArr = new String[max];
int tmp = 65;
for (int i = 0; i < max; i++) {
charArr[i] = String.valueOf((char) (tmp + i));
}
return charArr;
}

public static void print(String... input) {
if (input == null)
return;
for (String each : input) {
System.out.print(each);
}
}

public void run(Runnable r) {
tPool.submit(r);
}

public void shutdown() {
tPool.shutdown();
}
}

1. 变量控制

第一种解法,包含多种小的不同实现方式,但一个共同点就是靠一个共享变量来做控制。

1) 用最基本的synchronized、notify、wait

1
2
3
4
5
6
7
8
9
10
11
12
13
14
15
16
17
18
19
20
21
22
23
24
25
26
27
28
29
30
31
32
33
34
35
36
37
38
39
40
41
42
43
44
45
46
47
48
49
50
51
52
53
54
55
56
57
public class MethodOne {
private final ThreadToGo threadToGo = new ThreadToGo();
public static void main(String args[]) throws InterruptedException {
MethodOne one = new MethodOne();
Helper.instance.run(one.newThreadOne());
Helper.instance.run(one.newThreadTwo());
Helper.instance.shutdown();
}

public Runnable newThreadOne() {
final String[] inputArr = Helper.buildNoArr(52);
return new Runnable() {
private String[] arr = inputArr;
public void run() {
try {
for (int i = 0; i < arr.length; i = i + 2) {
synchronized (threadToGo) {
while (threadToGo.value == 2)
threadToGo.wait();
Helper.print(arr[i], arr[i + 1]);
threadToGo.value = 2;
threadToGo.notify();
}
}
} catch (InterruptedException e) {
System.out.println("Oops...");
}
}
};
}

public Runnable newThreadTwo() {
final String[] inputArr = Helper.buildCharArr(26);
return new Runnable() {
private String[] arr = inputArr;
public void run() {
try {
for (int i = 0; i < arr.length; i++) {
synchronized (threadToGo) {
while (threadToGo.value == 1)
threadToGo.wait();
Helper.print(arr[i]);
threadToGo.value = 1;
threadToGo.notify();
}
}
} catch (InterruptedException e) {
System.out.println("Oops...");
}
}
};
}

class ThreadToGo {
int value = 1;
}
}

2) 利用 LockCondition

1
2
3
4
5
6
7
8
9
10
11
12
13
14
15
16
17
18
19
20
21
22
23
24
25
26
27
28
29
30
31
32
33
34
35
36
37
38
39
40
41
42
43
44
45
46
47
48
49
50
51
52
53
54
55
56
57
58
59
60
61
public class MethodTwo {
private final ThreadToGo threadToGo = new ThreadToGo();
private Lock lock = new ReentrantLock(true);
private Condition condition = lock.newCondition();
public static void main(String args[]) throws InterruptedException {
MethodTwo two = new MethodTwo();
Helper.instance.run(two.newThreadOne());
Helper.instance.run(two.newThreadTwo());
Helper.instance.shutdown();
}

public Runnable newThreadOne() {
final String[] inputArr = Helper.buildNoArr(52);
return new Runnable() {
private String[] arr = inputArr;
public void run() {
for (int i = 0; i < arr.length; i = i + 2) {
try {
lock.lock();
while (threadToGo.value == 2)
condition.await();
Helper.print(arr[i], arr[i + 1]);
threadToGo.value = 2;
condition.signal();
} catch (InterruptedException e) {
e.printStackTrace();
} finally {
lock.unlock();
}
}
}
};
}

public Runnable newThreadTwo() {
final String[] inputArr = Helper.buildCharArr(26);
return new Runnable() {
private String[] arr = inputArr;
public void run() {
for (int i = 0; i < arr.length; i++) {
try {
lock.lock();
while (threadToGo.value == 1)
condition.await();
Helper.print(arr[i]);
threadToGo.value = 1;
condition.signal();
} catch (Exception e) {
e.printStackTrace();
} finally {
lock.unlock();
}
}
}
};
}

class ThreadToGo {
int value = 1;
}
}

3) 利用 volatile

volatile修饰的变量值直接存在main memory里面,子线程对该变量的读写直接写入main memory,而不是像其它变量一样在local thread里面产生一份copy。volatile能保证所修饰的变量对于多个线程可见性,即只要被修改,其它线程读到的一定是最新的值。

1
2
3
4
5
6
7
8
9
10
11
12
13
14
15
16
17
18
19
20
21
22
23
24
25
26
27
28
29
30
31
32
33
34
35
36
37
38
        public class MethodThree {
private volatile ThreadToGo threadToGo = new ThreadToGo();
class ThreadToGo {
int value = 1;
}
public Runnable newThreadOne() {
final String[] inputArr = Helper.buildNoArr(52);
return new Runnable() {
private String[] arr = inputArr;
public void run() {
for (int i = 0; i < arr.length; i=i+2) {
while(threadToGo.value==2){}
Helper.print(arr[i], arr[i + 1]);
threadToGo.value=2;
}
}
};
}
public Runnable newThreadTwo() {
final String[] inputArr = Helper.buildCharArr(26);
return new Runnable() {
private String[] arr = inputArr;
public void run() {
for (int i = 0; i < arr.length; i++) {
while(threadToGo.value==1){}
Helper.print(arr[i]);
threadToGo.value=1;
}
}
};
}
public static void main(String args[]) throws InterruptedException {
MethodThree three = new MethodThree();
Helper.instance.run(three.newThreadOne());
Helper.instance.run(three.newThreadTwo());
Helper.instance.shutdown();
}
}

4) 利用 AtomicInteger

1
2
3
4
5
6
7
8
9
10
11
12
13
14
15
16
17
18
19
20
21
22
23
24
25
26
27
28
29
30
31
32
33
34
35
36

public class MethodFive {
private AtomicInteger threadToGo = new AtomicInteger(1);
public Runnable newThreadOne() {
final String[] inputArr = Helper.buildNoArr(52);
return new Runnable() {
private String[] arr = inputArr;
public void run() {
for (int i = 0; i < arr.length; i=i+2) {
while(threadToGo.get()==2){}
Helper.print(arr[i], arr[i + 1]);
threadToGo.set(2);
}
}
};
}
public Runnable newThreadTwo() {
final String[] inputArr = Helper.buildCharArr(26);
return new Runnable() {
private String[] arr = inputArr;
public void run() {
for (int i = 0; i < arr.length; i++) {
while(threadToGo.get()==1){}
Helper.print(arr[i]);
threadToGo.set(1);
}
}
};
}
public static void main(String args[]) throws InterruptedException {
MethodFive five = new MethodFive();
Helper.instance.run(five.newThreadOne());
Helper.instance.run(five.newThreadTwo());
Helper.instance.shutdown();
}
}

2. CyclicBarrierAPI

CyclicBarrier可以实现让一组线程在全部到达Barrier时(执行await()),再一起同时执行,并且所有线程释放后,还能复用它,即为Cyclic

CyclicBarrier类提供两个构造器:

1
2
3
4
5
6
7
8
9
10
11
12
13
14
15
16
17
18
19
20
21
22
23
24
25
26
27
28
29
30
31
32
33
34
35
36
37
38
39
40
41
42
43
44
45
46
47
48
49
50
51
52
53
54
55
56
57
58
59
60
61
62
63
64
public class CyclicBarrier {
public CyclicBarrier(int parties, Runnable barrierAction) {
}

public CyclicBarrier(int parties) {
}
}
public class MethodFour{
private final CyclicBarrier barrier;
private final List<String> list;
public MethodFour() {
list = Collections.synchronizedList(new ArrayList<String>());
barrier = new CyclicBarrier(2,newBarrierAction());
}
public Runnable newThreadOne() {
final String[] inputArr = Helper.buildNoArr(52);
return new Runnable() {
private String[] arr = inputArr;
public void run() {
for (int i = 0, j=0; i < arr.length; i=i+2,j++) {
try {
list.add(arr[i]);
list.add(arr[i+1]);
barrier.await();
} catch (InterruptedException | BrokenBarrierException e) {
e.printStackTrace();
}
}
}
};
}
public Runnable newThreadTwo() {
final String[] inputArr = Helper.buildCharArr(26);
return new Runnable() {
private String[] arr = inputArr;
public void run() {
for (int i = 0; i < arr.length; i++) {
try {
list.add(arr[i]);
barrier.await();
} catch (InterruptedException | BrokenBarrierException e) {
e.printStackTrace();
}
}
}
};
}
private Runnable newBarrierAction(){
return new Runnable() {
@Override
public void run() {
Collections.sort(list);
list.forEach(c->System.out.print(c));
list.clear();
}
};
}
public static void main(String args[]){
MethodFour four = new MethodFour();
Helper.instance.run(four.newThreadOne());
Helper.instance.run(four.newThreadTwo());
Helper.instance.shutdown();
}
}

这里多说一点,这个API其实还是利用lockcondition,无非是多个线程去争抢CyclicBarrierinstance的lock罢了,最终barrierAction执行时,是在抢到CyclicBarrierinstance的那个线程上执行的。

3. PipedInputStreamAPI

这里用流在两个线程间通信,但是Java中的Stream是单向的,所以在两个线程中分别建了一个input和output。这显然是一种很搓的方式,不过也算是一种通信方式吧,执行的时候那种速度简直。。。。

1
2
3
4
5
6
7
8
9
10
11
12
13
14
15
16
17
18
19
20
21
22
23
24
25
26
27
28
29
30
31
32
33
34
35
36
37
38
39
40
41
42
43
44
45
46
47
48
49
50
51
52
53
54
55
56
57
58
59
60
61
62
63
64
65
66
67
68
69
70
71
72
73
74
75
76
77
78
79
80
81
82
83
84
85
public class MethodSix {
private final PipedInputStream inputStream1;
private final PipedOutputStream outputStream1;
private final PipedInputStream inputStream2;
private final PipedOutputStream outputStream2;
private final byte[] MSG;
public MethodSix() {
inputStream1 = new PipedInputStream();
outputStream1 = new PipedOutputStream();
inputStream2 = new PipedInputStream();
outputStream2 = new PipedOutputStream();
MSG = "Go".getBytes();
try {
inputStream1.connect(outputStream2);
inputStream2.connect(outputStream1);
} catch (IOException e) {
e.printStackTrace();
}
}

public void shutdown() throws IOException {
inputStream1.close();
inputStream2.close();
outputStream1.close();
outputStream2.close();
}

public Runnable newThreadOne() {
final String[] inputArr = Helper.buildNoArr(52);
return new Runnable() {
private String[] arr = inputArr;
private PipedInputStream in = inputStream1;
private PipedOutputStream out = outputStream1;
public void run() {
for (int i = 0; i < arr.length; i = i + 2) {
Helper.print(arr[i], arr[i + 1]);
try {
out.write(MSG);
byte[] inArr = new byte[2];
in.read(inArr);
while (true) {
if ("Go".equals(new String(inArr)))
break;
}
} catch (IOException e) {
e.printStackTrace();
}
}
}
};
}

public Runnable newThreadTwo() {
final String[] inputArr = Helper.buildCharArr(26);
return new Runnable() {
private String[] arr = inputArr;
private PipedInputStream in = inputStream2;
private PipedOutputStream out = outputStream2;
public void run() {
for (int i = 0; i < arr.length; i++) {
try {
byte[] inArr = new byte[2];
in.read(inArr);
while (true) {
if ("Go".equals(new String(inArr)))
break;
}
Helper.print(arr[i]);
out.write(MSG);
} catch (IOException e) {
e.printStackTrace();
}
}
}
};
}

public static void main(String args[]) throws IOException {
MethodSix six = new MethodSix();
Helper.instance.run(six.newThreadOne());
Helper.instance.run(six.newThreadTwo());
Helper.instance.shutdown();
six.shutdown();
}
}

4. BlockingQueue

顺便总结下BlockingQueue的一些内容

BlockingQueue定义的常用方法如下:

  • add(Object):把Object加到BlockingQueue里,如果BlockingQueue可以容纳,则返回true,否则抛出异常。
  • offer(Object):表示如果可能的话,将Object加到BlockingQueue里,即如果BlockingQueue可以容纳,则返回true,否则返回false
  • put(Object):把Object加到BlockingQueue里,如果BlockingQueue没有空间,则调用此方法的线程被阻断直到BlockingQueue里有空间再继续。
  • poll(time):获取并删除BlockingQueue里排在首位的对象,若不能立即取出,则可以等time参数规定的时间,取不到时返回null。当不传入time值时,立刻返回。
  • peek():立刻获取BlockingQueue里排在首位的对象,但不从队列里删除,如果队列为空,则返回null
  • take():获取并删除BlockingQueue里排在首位的对象,若BlockingQueue为空,阻断进入等待状态直到BlockingQueue有新的对象被加入为止。

BlockingQueue有四个具体的实现类:

  • ArrayBlockingQueue:规定大小的BlockingQueue,其构造函数必须带一个int参数来指明其大小。其所含的对象是以FIFO(先入先出)顺序排序的。
  • LinkedBlockingQueue:大小不定的BlockingQueue,若其构造函数带一个规定大小的参数,生成的BlockingQueue有大小限制,若不带大小参数,所生成的BlockingQueue的大小由Integer.MAX_VALUE来决定。其所含的对象是以FIFO顺序排序的。
  • PriorityBlockingQueue:类似于LinkedBlockingQueue,但其所含对象的排序不是FIFO,而是依据对象的自然排序顺序或者是构造函数所带的Comparator决定的顺序。
  • SynchronousQueue:特殊的BlockingQueue,对其的操作必须是放和取交替完成的。

这里用了两种玩法

1) 共享一个queue,根据peekpoll的不同来实现
2)两个queue,利用take()会自动阻塞来实现

1
2
3
4
5
6
7
8
9
10
11
12
13
14
15
16
17
18
19
20
21
22
23
24
25
26
27
28
29
30
31
32
33
34
35
36
37
38
39
40
41
42
43
44
45
46
47
48
49
50
51
52
53
54
55
56
57
58
59
60
61
62
63
64
65
66
67
68
69
70
71
72
73
74
75
76
77
78
79
80
81
82
83
84

public class MethodSeven {
private final LinkedBlockingQueue<String> queue = new LinkedBlockingQueue<>();
public Runnable newThreadOne() {
final String[] inputArr = Helper.buildNoArr(52);
return new Runnable() {
private String[] arr = inputArr;
public void run() {
for (int i = 0; i < arr.length; i = i + 2) {
Helper.print(arr[i], arr[i + 1]);
queue.offer("TwoToGo");
while (!"OneToGo".equals(queue.peek())) {
}
queue.poll();
}
}
};
}

public Runnable newThreadTwo() {
final String[] inputArr = Helper.buildCharArr(26);
return new Runnable() {
private String[] arr = inputArr;
public void run() {
for (int i = 0; i < arr.length; i++) {
while (!"TwoToGo".equals(queue.peek())) {
}
queue.poll();
Helper.print(arr[i]);
queue.offer("OneToGo");
}
}
};
}

private final LinkedBlockingQueue<String> queue1 = new LinkedBlockingQueue<>();
private final LinkedBlockingQueue<String> queue2 = new LinkedBlockingQueue<>();
public Runnable newThreadThree() {
final String[] inputArr = Helper.buildNoArr(52);
return new Runnable() {
private String[] arr = inputArr;
public void run() {
for (int i = 0; i < arr.length; i = i + 2) {
Helper.print(arr[i], arr[i + 1]);
try {
queue2.put("TwoToGo");
queue1.take();
} catch (InterruptedException e) {
e.printStackTrace();
}
}
}
};
}

public Runnable newThreadFour() {
final String[] inputArr = Helper.buildCharArr(26);
return new Runnable() {
private String[] arr = inputArr;
public void run() {
for (int i = 0; i < arr.length; i++) {
try {
queue2.take();
Helper.print(arr[i]);
queue1.put("OneToGo");
} catch (InterruptedException e) {
e.printStackTrace();
}
}
}
};
}

public static void main(String args[]) throws InterruptedException {
MethodSeven seven = new MethodSeven();
Helper.instance.run(seven.newThreadOne());
Helper.instance.run(seven.newThreadTwo());
Thread.sleep(2000);
System.out.println("");
Helper.instance.run(seven.newThreadThree());
Helper.instance.run(seven.newThreadFour());
Helper.instance.shutdown();
}
}

题目

1
2
3
4
5
6
7
8
9
10
11
12
13
14
15
16
17
18
19
public class BadCode {
/**
* 计算总数
*/

public void countDemo(){
int num = 0;
for (int i=0;i<100;i++){
num = num ++;
/**
* do something
*/

}
System.out.println(num);
}
/**
* 输出结果:num=0
* 然后 我叫了个大神来我帮我分析下。囧
*/

}

解释

1
2
3
4
i++ :
temp = i ;
i = i + 1;
i = temp;

so in “n = n ++;”, n always equals temp , always equals 0;

说明了“先赋值后自增”有问题,或许是理解问题或许是表述问题,也可能是实现问题。
赋值给自身,导致无法自增。
另外,反汇编发现自增操作好像发生在赋值操作之前。

是的,自增是发生在赋值之前,但是赋值的时候不是取的自增后的值。
(应该是产生了一个中间变量,javap 可以查看class 字节码)

来自 https://gitee.com/oschina/bullshit-codes/blob/master/java/BadCode.java

题目: Integer 比较200是否等于200

  1. IntegerCache的缓存值范围默认-128-127(可以用JVM命令参数调整)
  2. Integer比较使用equals(), 因为使用==比较只能用于-128-127的范围

spring(数据库)事务隔离级别分为四种(级别递减)

  1. Serializable(串行化): 最严格的级别,事务串行执行,资源消耗最大

  2. REPEATABLE READ(重复读): 保证了一个事务不会修改已经由另一个事务读取但未提交(回滚)的数据。避免了“脏读取”和“不可重复读取”的情况,但不能避免“幻读”,但是带来了更多的性能损失。

  3. READ COMMITTED(提交读): 大多数主流数据库的默认事务等级,保证了一个事务不会读到另一个并行事务已修改但未提交的数据,避免了“脏读取”,但不能避免“幻读”和“不可重复读取”。该级别适用于大多数系统。

  4. Read Uncommitted(未提交读): 事务中的修改,即使没有提交,其他事务也可以看得到,会导致“脏读”、“幻读”和“不可重复读取”。

脏读,不可重复读,幻读

1. 脏读: 读取了其他事务未提交的数据

转账事务A 取款事务B
1 开始事务
2 开始事务
3 查询账户余额为2000元
4 取款1000元,余额被更改为1000元
5 查询账户余额为1000元(产生脏读)
6 取款操作发生未知错误,事务回滚,余额变更为2000元
7 转入2000元,余额被更改为3000元(脏读1000+2000)
8 提交事务

事务B取出金额1000元后事务未提交,事务A查到了余额1000元(事务B取出后的金额),当事务B回滚后, 这时事务A累加金额+2000元, 正确应该为4000元,但并不知道事务B已经把金额回滚到2000元, 事务A最后累加的总金额为1000+2000=3000元.

  • 正确应该是账户余额为4000元

2. 不可重复读: 前后多次读取, 数据内容不一致

转账事务A 取款事务B
1 开始事务
2 第一次查询账户余额为2000元
3 开始事务 其他操作
4 取款金额1000元, 余额1000元 其他操作
5 提交事务 其他操作
6 第二次查询账户余额为1000元

事务B的事务比较长, 且查询了两次账户, 第一次和第二次取出的金额不匹配, 因此数据不重复了, 系统不可以读取到重复的数据, 成为不可重复读.

  • 正确应该是事务B两次查询的金额是一致的

3. 幻读: 前后多次读取, 数据总量不一致

出入账事务A 流水事务B
1 开始事务
2 第一次查询总流水记录100条
3 开始事务 第一次查询总流水记录100条
4 进账出账流水记录+2条 其他操作
5 提交事务 其他操作
6 第二次查询总流水记录102条

事务B在执行读取操作,需要两次统计数据的总量,前一次查询数据总量后,此时事务B执行了新增数据的操作并提交后,这个时候事务A读取的数据总量和之前统计的不一样,就像产生了幻觉一样,平白无故的多了几条数据,成为幻读

  • 正确应该是第二次查询也是100条记录和第一次一致

不可重复读和幻读的区别

  1. 不可重复读是读取了其他事务更改的数据,针对insert与update操作

    解决方法:

    • 用行级锁,锁定该行,事务A多次读取操作完成后才释放该锁,这个时候才允许其他事务更改刚才的数据.
  2. 幻读是读取了其他事务新增的数据,针对insert与delete操作

    解决方法:

    • 使用表级锁,锁定整张表,事务A多次读取数据总量之后才释放该锁,这个时候才允许其他事务新增数据.
    • 幻读的另一种解决方案,版本控制,表级锁用了那和串行读没什么区别,性能太低,在mysql中innodb自带有版本控制,可以很好的解决,而且幻读产生的根本原因是采用的行级锁,所以只针对脏读和重复读有用

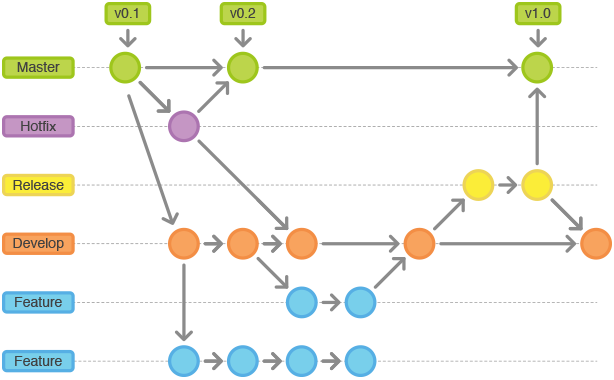
Git Flow

分支图

Image text

分支说明

分支名 描述
Master 上线/线上分支
Hotfix 修复线上补丁分支
Release 发布分支(待上线,上线版本测试专用)
Develop 开发分支(只能提交准备上线版本的功能)
Feature 功能分支(每个人的独立分支, 只有完成且在当前准备上线版本时才能合并到Develop)

Git commit message 提交日志格式

1. 提交日志格式

每次提交, Commit message 都包括三个部分: header, body, footer

1
2
3
4
5
<type>(<scope>): <subject>
// 空行
<body>
// 空行
<footer>

其中header是必须的, bodyfooter可以省略。

提交消息的任何行都不能超过100个字符!为了在github以及各种git工具中更容易阅读消息。

2. header

header部分只有一行, 包括三个字段type(必须), scope, subject

(1) type

用于说明commit的类别。

type 描述
feat 新功能(feature)
fix 修补bug
docs 文档(documentation)
perf 改进性能的代码更改
style 不影响代码含义的更改(空格,格式,缺少分号等)
refactor 重构(即不是新增功能, 也不是修改bug的代码变动)
test 添加缺失测试或更正现有测试
chore 其他修改(非src或测试文件的修改)
ci CI配置文件和脚本的更改(示例范围: Circle, BrowserStack, SauceLabs)
build 影响构建系统或外部依赖项的更改(示例范围:gulp,broccoli,npm)
revert 返回以前的提交

(2) scope

用于说明commit影响的范围, 比如数据层、控制层、视图层等等, 视项目不同而不同。

(3) scope

commit目的的简短描述, 不超过50个字符。

  • 以动词开头, 使用第一人称现在时, 比如change, 而不是changed或changes
  • 第一个字母小写
  • 结尾不加句号(.)

3. body

body部分是对本次commit的详细描述, 可以分成多行。

下面是一个范例:

1
2
3
4
5
6
More detailed explanatory text, if necessary.  Wrap it to about 72 characters or so. 

Further paragraphs come after blank lines.

- Bullet points are okay, too
- Use a hanging indent

有两个注意点:

1
2
3
(1)使用第一人称现在时, 比如使用change而不是changed或changes。

(2)应该说明代码变动的动机, 以及与以前行为的对比。

footer部分只用于两种情况:

(1)不兼容变动

如果当前代码与上一个版本不兼容,则footer部分以BREAKING CHANGE开头,后面是对变动的描述、以及变动理由和迁移方法。

(2)关闭Issue

如果当前commit针对某个issue,那么可以在 Footer 部分关闭这个 issue 。

1
Closes #234

也可以一次关闭多个 issue 。

1
Closes #123, #245, #992

5. revert

还有一种特殊情况,如果当前commit用于撤销以前的 commit,则必须以revert:开头,后面跟着被撤销commit的 Header。

1
2
3
revert: feat(pencil): add 'graphiteWidth' option

This reverts commit 667ecc1654a317a13331b17617d973392f415f02.

Body部分的格式是固定的,必须写成This reverts commit .,其中的hash是被撤销commit的 SHA 标识符。

如果当前commit与被撤销的 commit,在同一个发布(release)里面,那么它们都不会出现在 Change log 里面。如果两者在不同的发布,那么当前 commit,会出现在 Change log 的Reverts小标题下面。

题目: 有1千万个随机数,随机数的范围在1到1亿之间。现在要求写出一种算法,将1到1亿之间没有在随机数中的数求出来

代码

1
2
3
4
5
6
7
8
9
10
11
12
13
14
15
16
17
18
19
20
21
22
23
24
25
26
27
28
29
30
31
32
33
public class Alibaba {
public static void main(String[] args) {

// 生成随机数
Random random=new Random();
List<Integer> list=new ArrayList<>();
for(int i=0;i<10000000;i++) {
int randomResult=random.nextInt(100000000);
list.add(randomResult);
}

// 打印生成随机数
System.out.println("产生的随机数有");
for(int i=0;i<list.size();i++) {
System.out.println(list.get(i));
}

// 创建一亿位的BitSet
BitSet bitSet=new BitSet(100000000);
for(int i=0;i<10000000;i++) {
// 把随机数放进去
bitSet.set(list.get(i));
}

// 打印结果:0~1亿不在上述随机数中的结果
System.out.println("0~1亿不在上述随机数中有" + bitSet.size());
for (int i = 0; i < 100000000; i++) {
if(!bitSet.get(i)) {
System.out.println(i);
}
}
}
}

说明 BitSet

  1. 去重
  2. 正序
  3. 长度为64倍数(默认64)
  4. get()方法是返回boolean值, 存在值为true, 不存在为false(注意:这个get的参数是值, 并不是索引下标)

spring mvc 返回图片

1
2
3
4
5
6
7
8
9
10
11
12
13
14
15
16
17
18
19
20
21
@RestController

...

@PostMapping("wxa/code")
public ResponseEntity<?> getWxaShareCode() {
try {

ByteArrayOutputStream byteArrayOutputStream =
TucHttpUtil.httpPostInputStream("https://developers.weixin.qq.com/miniprogram/dev/image/qrcode/qrcode.png?t=18082721", null);

InputStream is = new ByteArrayInputStream(byteArrayOutputStream.toByteArray());
return ResponseEntity.ok()
.header("content-type","image/png")
.body(new InputStreamResource(is));

} catch (Exception e) {
return ResponseEntity.notFound().build();
}
}
...
  1. 使用ResponseEntity可以和@RestController共用
  2. ResponseEntity是restful的响应体, 相当于sevlet的HttpSevletResponse的设置
  3. InputSteam如果直接返回可能会导致流无法关闭, 使用ByteArrayOutputStream把数据保存在内存, 然后返回(可能会涉及回收问题)
  4. 返回文件(比如图片), 需要设置header(“content-type”,”image/png”)

说明

使用java类+yml配置+JUnit搭建mybatis生成器项目, 能让其他项目快速接入生成mybatis使用的类和文件。

  1. java类用于代替传统的xml配置, 简化配置成本和上手成本。
  2. 配置文件使用YAML语法, 相比xml能大大增强阅读性。
  3. 使用JUnit启动运行, 能有效隔离项目, 区分业务和工具, 降低对项目的影响。

需要引入的jar包和版本说明

jar包 版本 作用 是否必要
lombok 1.16.20 自动生成getter/setter方法, 加强源码阅读性 可选
fastjson 1.2.47 JSON序列化框架 必要, 也可以用其他序列化框架代替
snakeyaml 1.17 用于读取解析YAML文件配置 必要
mysql-connector-java 5.1.46 用于连接数据库 必要
⭐mybatis-generator-core 1.3.6 生成器的核心包, 建议升级到1.3.6以上版本,这个版本支持覆盖文件 必要
⭐mybatis-generator-maven-plugin 1.3.6 生成器maven插件(内包含了生成器核心包) 必要
junit 4.12 单例测试, 用于启动 必要

项目结构

生成文件

  1. entity.java
  2. mapper.java
  3. mapper.xml

目录结构

1
2
3
4
5
6
7
8
9
10
11
12
13
14
15
16
17
18

生成文件目录
src
main
java
entity -------- 生成的实体
mapper -------- 生成的mapper
po -------- 自定义po(用于自定义sql映射的实体)
mapperExt -------- 自定义mapper
resources
mapperXml -------- 自动生成sql
mapperXmlExt -------- 自定义sql

运行目录
test
java
generator -------- 存放生成器的启动类(单例测试)
resource --------- 存放生成器YMAL配置文件`generator.yml`

配置和类

配置文件

  1. 新建generator.yml

    1
    2
    3
    4
    5
    6
    7
    8
    9
    10
    11
    12
    13
    14
    15
    16
    17
    18
    19
    20
    21
    22
    23
    24
    25
    26
    27
    28
    29
    30
    31
    32
    #需要生成的表名
    tableNames :
    - user_table

    #------------------------- 数据库连接 ----------------------------------

    url : jdbc:mysql://host:port/dbname
    user : username
    password : password

    #------------------------- 个人路径(改这里就可以) ----------------------------------

    #项目所在的地址路径(默认根据target/自动获取所在根目录, 目录下mybatis-generator文件夹, 也可自定义设置绝对路径)
    #projectPath : D:\Project\
    #jar包的绝对路径(默认根据driverClass包名自动获取, 也可自定义设置绝对路径)
    #classPath : D:\mysql\mysql-connector-java-5.1.40.jar

    # ------------------------- 项目配置 ----------------------------------

    driverClass : com.mysql.jdbc.Driver

    #实体包名和位置
    javaModelGeneratorPackage : com.user.entity
    javaModelGeneratorProject : src\main\java

    #mapper包名和位置
    javaClientGeneratorPackage : com.user.mapper
    javaClientGeneratorProject : src\main\java

    #mapperXml位置
    sqlMapGeneratorPackage : mapperXml
    sqlMapGeneratorProject : src\main\resources

java类

  1. 配置覆盖参数

    生成规则默认使用IntrospectedTableMyBatis3Impl, 但是没有isMergeable(覆盖)的可设置方法, 改一下
    注意:1.3.6之前的版本都不能设置覆盖, 只能追加(可能我不会), 1.3.6版本开放了这个参数

    1
    2
    3
    4
    5
    6
    7
    8
    9
    10
    11
    12
    13
    14
    15
    16
    17
    18
    19
    20
    public class MyIntrospectedTableMyBatis3Impl extends IntrospectedTableMyBatis3Impl {

    @Override
    public List<GeneratedXmlFile> getGeneratedXmlFiles() {
    List<GeneratedXmlFile> answer = new ArrayList<>();

    if (xmlMapperGenerator != null) {
    Document document = xmlMapperGenerator.getDocument();
    GeneratedXmlFile gxf = new GeneratedXmlFile(document,
    getMyBatis3XmlMapperFileName(), getMyBatis3XmlMapperPackage(),
    context.getSqlMapGeneratorConfiguration().getTargetProject(),
    false, context.getXmlFormatter());
    if (context.getPlugins().sqlMapGenerated(gxf, this)) {
    answer.add(gxf);
    }
    }

    return answer;
    }
    }
  2. 配置信息,主要获取yml配置文件

    1
    2
    3
    4
    5
    6
    7
    8
    9
    10
    11
    12
    13
    14
    15
    16
    17
    18
    19
    20
    21
    22
    23
    24
    25
    26
    27
    28
    29
    30
    31
    32
    33
    34
    35
    36
    37
    38
    39
    40
    41
    42
    43
    44
    45
    46
    47
    48
    49
    50
    51
    52
    53
    54
    55
    56
    57
    58
    59
    60
    61
    62
    63
    64
    65
    66
    67
    68
    69
    70
    71
    72
    73
    74
    75
    76
    77
    78
    79
    80
    81
    82
    83
    84
    85
    86
    87
    88
    89
    90
    91
    @Data
    @Accessors(chain = true)
    public class MyGeneratorConfig {

    private String[] tableNames;
    private String classPath;
    private String driverClass;
    private String url;
    private String user;
    private String password;
    private String schema;
    /**
    * 绝对路径项目根目录
    */
    private String projectPath;
    private String javaModelGeneratorPackage;
    private String javaModelGeneratorProject;
    private String javaClientGeneratorPackage;
    private String javaClientGeneratorProject;
    private String sqlMapGeneratorPackage;
    private String sqlMapGeneratorProject;

    MyGeneratorConfig() {

    }

    /**
    * 配置文件"generator.yml"
    * @param ymlName
    * @return
    */
    public MyGeneratorConfig getConfig(String ymlName) {

    Map<String, Object> map = new HashMap<>();
    Yaml yaml = new Yaml();
    InputStream is = this.getClass().getClassLoader().getResourceAsStream(ymlName);
    if (is != null) {
    Object obj = yaml.load(is);
    if (obj != null) {
    map = (Map<String, Object>) obj;
    }
    }

    MyGeneratorConfig myGeneratorConfig = JSON.parseObject(JSON.toJSONString(map), this.getClass());

    if (StringUtils.isBlank(myGeneratorConfig.getClassPath())) {
    // 获取驱动包路径
    try {
    String driverClassPath = Class.forName(myGeneratorConfig.getDriverClass())
    .getProtectionDomain()
    .getCodeSource()
    .getLocation()
    .getPath()
    .replace("/", "\\").substring(1);
    myGeneratorConfig.setClassPath(driverClassPath);
    } catch (ClassNotFoundException e) {
    e.printStackTrace();
    }
    }

    if (StringUtils.isBlank(myGeneratorConfig.getProjectPath())) {
    // 默认获取项目路径
    String[] projectPaths = MyGeneratorConfig.class.getResource("/").getPath().split("/target");
    projectPath = projectPaths[0].replace("/", "\\").substring(1) + "\\" + "mybatis-generator" + "\\";
    // 处理中文路劲
    try {
    projectPath = java.net.URLDecoder.decode(projectPath,"utf-8");
    } catch (UnsupportedEncodingException e) {
    e.printStackTrace();
    }
    myGeneratorConfig.setProjectPath(projectPath);
    }

    projectPath = myGeneratorConfig.getProjectPath();
    myGeneratorConfig.setJavaModelGeneratorProject(projectPath + myGeneratorConfig.getJavaModelGeneratorProject());
    myGeneratorConfig.setJavaClientGeneratorProject(projectPath + myGeneratorConfig.getJavaClientGeneratorProject());
    myGeneratorConfig.setSqlMapGeneratorProject(projectPath + myGeneratorConfig.getSqlMapGeneratorProject());

    // 创建文件夹
    new File(myGeneratorConfig.getProjectPath()).mkdirs();
    new File(myGeneratorConfig.getJavaModelGeneratorProject()).mkdirs();
    new File(myGeneratorConfig.getJavaClientGeneratorProject()).mkdirs();
    new File(myGeneratorConfig.getSqlMapGeneratorProject()).mkdirs();

    System.out.println("entity path:" + myGeneratorConfig.getJavaModelGeneratorProject());
    System.out.println("mapperJava path:" + myGeneratorConfig.getJavaClientGeneratorProject());
    System.out.println("mapperXml path:" + myGeneratorConfig.getSqlMapGeneratorProject());

    return myGeneratorConfig;
    }
    }
  3. 构建生成配置

    1
    2
    3
    4
    5
    6
    7
    8
    9
    10
    11
    12
    13
    14
    15
    16
    17
    18
    19
    20
    21
    22
    23
    24
    25
    26
    27
    28
    29
    30
    31
    32
    33
    34
    35
    36
    37
    38
    39
    40
    41
    42
    43
    44
    45
    46
    47
    48
    49
    50
    51
    52
    53
    54
    55
    56
    57
    58
    59
    60
    61
    62
    63
    64
    65
    66
    67
    68
    69
    70
    71
    72
    73
    74
    75
    76
    77
    78
    79
    80
    81
    82
    83
    84
    85
    86
    87
    88
    89
    90
    91
    92
    93
    94
    95
    96
    97
    98
    99
    100
    101
    102
    103
    104
    105
    106
    107
    108
    109
    110
    111
    112
    113
    114
    115
    116
    117
    118
    119
    120
    121
    122
    123
    124
    125
    126
    127
    128
    129
    130
    131
    132
    133
    134
    135
    136
    137
    138
    139
    140
    141
    142
    143
    144
    145
    146
    147
    148
    149
    150
    151
    152
    153
    154
    155
    156
    157
    158
    159
    160
    161
    162
    163
    164
    165
    166
    167
    168
    169
    170
    171
    172
    173
    174
    175
    176
    public class MybatisGeneratorMain {

    private Log logger = LogFactory.getLog(getClass());

    private Context context = new Context(ModelType.FLAT);
    private List<String> warnings = new ArrayList<>();
    /**
    * 获取配置
    */

    private MyGeneratorConfig myGeneratorConfig = null;

    public MybatisGeneratorMain(String ymlPath) {

    // 设置配置文件
    this.myGeneratorConfig = new MyGeneratorConfig().getConfig(ymlPath);
    // 生成
    generator();
    }

    /**
    * 生成代码主方法
    */

    private void generator() {

    if (StringUtils.isNotBlank(myGeneratorConfig.getSchema())) {
    myGeneratorConfig.setUrl(myGeneratorConfig.getUrl() + "/" + myGeneratorConfig.getSchema());
    }

    context.setId("prod");
    // context.setTargetRuntime("MyBatis3");
    context.setTargetRuntime(MyIntrospectedTableMyBatis3Impl.class.getName());

    // ---------- 配置信息 start ----------

    pluginBuilder(context, "org.mybatis.generator.plugins.ToStringPlugin");
    pluginBuilder(context, "org.mybatis.generator.plugins.FluentBuilderMethodsPlugin");

    commentGeneratorBuilder(context);

    jdbcConnectionBuilder(context);

    javaTypeResolverBuilder(context);

    javaModelGeneratorBuilder(context);

    sqlMapGeneratorBuilder(context);

    javaClientGeneratorBuilder(context);

    tableBuilder(context, myGeneratorConfig.getSchema(), myGeneratorConfig.getTableNames());

    // ---------- 配置信息 end ----------


    // --------- 校验,执行 ---------
    Configuration config = new Configuration();
    config.addClasspathEntry(myGeneratorConfig.getClassPath());
    config.addContext(context);
    DefaultShellCallback callback = new DefaultShellCallback(true);

    try {
    MyBatisGenerator myBatisGenerator = new MyBatisGenerator(config, callback, warnings);
    myBatisGenerator.generate(null);
    } catch (Exception e) {
    e.printStackTrace();
    }
    logger.warn("warnings=" + warnings);
    }

    /**
    * plugin
    * @param context
    */

    private void pluginBuilder(Context context, String configurationType) {
    PluginConfiguration pluginConfiguration = new PluginConfiguration();
    pluginConfiguration.setConfigurationType(configurationType);
    context.addPluginConfiguration(pluginConfiguration);
    }

    /**
    * commentGenerator
    * @param context
    */

    private void commentGeneratorBuilder(Context context) {
    CommentGeneratorConfiguration commentGeneratorConfiguration = new CommentGeneratorConfiguration();
    commentGeneratorConfiguration.addProperty("suppressDate", "true");
    commentGeneratorConfiguration.addProperty("suppressAllComments", "false");
    commentGeneratorConfiguration.addProperty("addRemarkComments", "true");
    commentGeneratorConfiguration.addProperty("javaFileEncoding", "UTF-8");
    context.setCommentGeneratorConfiguration(commentGeneratorConfiguration);
    }

    /**
    * jdbcConnection
    * @param context
    */

    private void jdbcConnectionBuilder(Context context) {
    JDBCConnectionConfiguration jdbc = new JDBCConnectionConfiguration();
    jdbc.setConnectionURL(myGeneratorConfig.getUrl());
    jdbc.setDriverClass(myGeneratorConfig.getDriverClass());
    jdbc.setUserId(myGeneratorConfig.getUser());
    jdbc.setPassword(myGeneratorConfig.getPassword());
    context.setJdbcConnectionConfiguration(jdbc);
    }

    /**
    * javaTypeResolver
    * @param context
    */

    private void javaTypeResolverBuilder(Context context) {
    JavaTypeResolverConfiguration javaTypeResolverConfiguration = new JavaTypeResolverConfiguration();
    javaTypeResolverConfiguration.addProperty("forceBigDecimals", "true");
    context.setJavaTypeResolverConfiguration(javaTypeResolverConfiguration);
    }

    /**
    * javaModelGenerator
    * @param context
    */

    private void javaModelGeneratorBuilder(Context context) {
    JavaModelGeneratorConfiguration javaModel = new JavaModelGeneratorConfiguration();
    javaModel.setTargetPackage(myGeneratorConfig.getJavaModelGeneratorPackage());
    javaModel.setTargetProject(myGeneratorConfig.getJavaModelGeneratorProject());
    javaModel.addProperty("trimStrings", "true");
    javaModel.addProperty("enableSubPackages", "true");
    context.setJavaModelGeneratorConfiguration(javaModel);
    }

    /**
    * sqlMapGenerator
    * @param context
    */

    private void sqlMapGeneratorBuilder(Context context) {
    SqlMapGeneratorConfiguration sqlMapGeneratorConfiguration = new SqlMapGeneratorConfiguration();
    sqlMapGeneratorConfiguration.setTargetPackage(myGeneratorConfig.getSqlMapGeneratorPackage());
    sqlMapGeneratorConfiguration.setTargetProject(myGeneratorConfig.getSqlMapGeneratorProject());
    sqlMapGeneratorConfiguration.addProperty("enableSubPackages", "true");
    context.setSqlMapGeneratorConfiguration(sqlMapGeneratorConfiguration);
    }

    /**
    * javaClientGenerator
    * @param context
    */

    private void javaClientGeneratorBuilder(Context context) {
    JavaClientGeneratorConfiguration javaClientGeneratorConfiguration = new JavaClientGeneratorConfiguration();
    javaClientGeneratorConfiguration.setTargetPackage(myGeneratorConfig.getJavaClientGeneratorPackage());
    javaClientGeneratorConfiguration.setTargetProject(myGeneratorConfig.getJavaClientGeneratorProject());
    javaClientGeneratorConfiguration.setConfigurationType("XMLMAPPER");
    javaClientGeneratorConfiguration.addProperty("enableSubPackages", "true");
    context.setJavaClientGeneratorConfiguration(javaClientGeneratorConfiguration);

    }

    /**
    * table
    * @param context
    * @param schema 添加SQL表名前面的库名
    * @param tableName
    */

    private void tableBuilder(Context context, String schema, String...tableName) {
    for (String table : tableName) {
    TableConfiguration tableConfiguration = new TableConfiguration(context);
    tableConfiguration.setTableName(table);
    tableConfiguration.setCountByExampleStatementEnabled(false);
    tableConfiguration.setUpdateByExampleStatementEnabled(false);
    tableConfiguration.setDeleteByExampleStatementEnabled(false);
    tableConfiguration.setSelectByExampleStatementEnabled(false);
    if (StringUtils.isNotBlank(schema)) {
    tableConfiguration.setSchema(schema);
    tableConfiguration.addProperty("runtimeSchema", schema);
    }
    context.addTableConfiguration(tableConfiguration);
    }
    }
    }
  4. 运行

    1
    2
    3
    4
    5
    6
    7
    public class MainGenerator {

    @Test
    public void generator() {
    new MybatisGeneratorMain("generator.yml");
    }
    }